Home Renovation · Solar
Planning During Construction
If the Ventura house walls are open now but the solar and battery installation will happen later, the goal is not to design the final system today. The goal is to do only the rough-in work that would be significantly more expensive, ugly, or disruptive after drywall: conduit, clear equipment pathways, panel/gateway space, documentation, and a realistic plan for batteries that may sit far from the main panel.
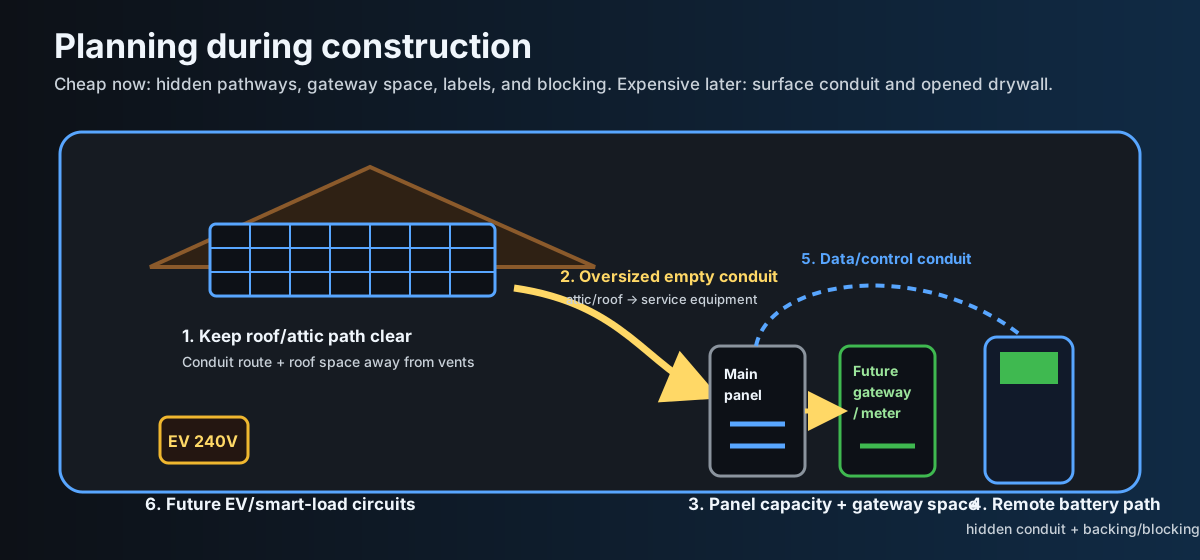
The highest-leverage work while walls are open is not buying panels or batteries; it is preserving hidden pathways, gateway space, and smart-load options for a clean install later.
Short answer: what to do now
Run empty conduit
Install oversized, continuous empty conduit from the attic/roof-access area to the future inverter/gateway/electrical equipment area and likely west-wall battery location. Add pull string and label both ends.
Upgrade panel capacity
If the service or main panel is being touched anyway, size it for solar, battery, EV charging, heat pumps, and future electrification. Leave physical breaker space and bus capacity.
Preserve backup architecture
Plan for whole-home backup with smart load management later, but only rough in durable paths now: gateway space, control/data conduit, and wiring access for large-load shedding.
Priority rough-ins during construction
- Solar conduit path: one or more oversized empty conduits from attic/roof vicinity to the main electrical/equipment area. Larger, straighter, accessible conduit with pull string is a low-regret choice; barely adequate conduit is what becomes painful later.
- Main-panel / gateway zone: preserve working clearance and wall space near the service equipment for a future backup gateway, transfer equipment, production/consumption metering, disconnects, and possibly load-management modules. This matters even if batteries are not next to the main panel.
- Remote battery pathway: because there is no good battery location near the main panel, identify one or two plausible remote battery locations now and run empty conduit or an accessible pathway from the main electrical area to that location. Ask the installer/electrician whether the likely future architecture would need AC conductors, DC conductors, communications, or both; do not guess the final wiring, but preserve the route.
- Battery location blocking and clearances: if a remote garage/exterior/utility-wall location is plausible, add backing/blocking where wall-mounted equipment might go, preserve working clearance, avoid future cabinetry, and keep the area serviceable. Final location still needs a licensed installer/code review for fire, ventilation, weather, impact, and manufacturer rules.
- Whole-home backup readiness: if the likely long-term target is whole-home backup with smart load management, do not over-invest in moving every “critical” circuit into a separate subpanel right now. Instead, preserve room for the gateway and load-management hardware, and keep large loads identifiable and controllable.
- Large-load control paths: for HVAC, heat pump water heater, dryer, oven/range, EV charger, pool/spa, or other large loads, make sure their circuits are well labeled and routed so smart load modules, contactors, or a smart panel can be added without tearing into finished walls.
- Data/control wiring: run Ethernet or low-voltage conduit from the network area to the electrical equipment area and, if practical, to the likely battery/equipment wall. Batteries, gateways, meters, and energy monitors often need reliable networking or control wiring.
- EV charging prep: if there may be an EV, rough in a 240V EV charger circuit or conduit now. EV charging materially changes solar/battery sizing and load-management strategy.
- Roof/attic coordination: keep plumbing vents, attic fans, satellite hardware, and roof penetrations away from the best south-facing solar plane where possible.
- Photos and labels: before drywall, photograph every conduit path, panel bay, blocking, and wall cavity with a tape measure visible. Label spare conduits and leave a simple as-built note in the panel.
Whole-home backup + smart load management later
Likely direction: design for a future whole-home backup architecture, but avoid buying vendor-specific hardware or moving lots of circuits today unless the electrician says it is uniquely cheap right now. The construction-phase win is preserving pathways and space so a future installer has options.
Do now if walls are open
- Leave gateway/transfer-equipment wall space near service equipment.
- Run empty conduit to likely remote battery locations.
- Provide Ethernet/control conduit to equipment areas.
- Keep large-load circuits labeled and accessible.
- Photograph panel bays, wall cavities, conduits, and blocking.
Usually OK to defer
- Buying batteries, inverter, gateway, smart panel, or load modules.
- Choosing Tesla/Enphase/Franklin/Span/Generac/etc. now.
- Moving every circuit into a backup subpanel if smart load management is the real target.
- Final battery sizing, solar sizing, and outage-runtime design.
Remote battery location issue
The main panel does not need to be the battery location, but distance changes the design. A remote battery location can be fine if the future installer has a clean, code-compliant route for power conductors and communications between the service equipment, inverter/gateway, batteries, and solar equipment. What becomes ugly later is surface-mounted conduit across finished walls or having to open drywall to create that route.
Do not assume the conductor type now. Some systems keep batteries close to an inverter/gateway; others support different AC-coupled or DC-coupled layouts. The safe rough-in is usually empty conduit/pathway, pull string, labels, and space — not committing to proprietary cable before the system is selected.
SE main panel → attic → west-wall batteries
The current likely layout is: main service / gateway area at the southeast corner, solar on the roof, batteries on the west wall, with roughly a long attic run plus a short exterior drop at the battery wall. That points to a hybrid rough-in strategy: keep the southeast corner clean and mostly concealed, use the attic as the main hidden pathway, and accept neat exterior conduit only at the west-wall battery drop.
Southeast corner: keep it clean
- Preserve in-wall or concealed pathways near the main panel for gateway/transfer equipment, power conductors, metering, and load-management gear.
- Do not crowd the wall with plumbing, storage, cabinetry, or low-voltage panels that would block future electrical equipment.
- Keep communication/control cabling physically separated from high-current battery feeders where they run in parallel; cross at 90° when needed.
- Use nail plates, fire-blocking, and clean labeled stub-outs wherever wiring or conduit passes through framing.
West wall: make conduit acceptable
- Plan for batteries on the west wall only if there is working clearance, code-compliant location, impact protection if needed, and a serviceable mounting surface.
- External conduit is acceptable on the west wall, but make it deliberate: short, straight, paintable, well supported, and placed where it will not look like an afterthought.
- Because west-facing equipment gets afternoon sun, leave room for shade/sun shield or a ventilated cover if the battery manufacturer allows it.
- Seal wall/attic penetrations properly so the conduit path does not become an air, moisture, pest, or condensation problem.
Attic run quality checks
- Ask for voltage-drop and temperature-derating math: a long attic run plus battery charge/discharge current can require larger conductors than a short back-to-back install. The installer should size conductors for actual run length, attic temperature, conduit fill, and battery/inverter current — not just use the minimum size from a short-run example.
- Protect the attic pathway: the 60-ish foot attic portion should be treated as permanent infrastructure. Prefer protected raceway/pathway and avoid loose, vulnerable cable across attic areas where rodents, future trades, storage, or foot traffic could damage it.
- Separate power and communications: for a long battery-to-gateway run, plan a separate communications/control pathway or clearly separated in-wall/attic routing. Standard low-voltage cable generally should not share power raceways unless it is specifically rated and allowed for that use.
- Leave pull access: if using empty conduit now, include pull string and accessible pull points so a future installer can actually use the route without opening drywall.
- Exterior drop details matter: where the attic path exits to the west-wall batteries, plan a clean transition, weather sealing, expansion/movement accommodation where required, and enough space for disconnects or manufacturer-required equipment.
Critical-loads subpanel vs smart load management
Critical-loads subpanel
Still useful if the future system will back up only selected circuits. It is simple and proven, but it can be limiting if the long-term goal is whole-home backup.
- Fridge/freezer
- Internet/networking
- Selected lights and outlets
- Garage door opener
- Security/essential low-voltage gear
Smart load management
Better match for whole-home backup. The system can shed or sequence large loads so batteries do not need to support every possible load at once.
- HVAC / heat pump compressor
- EV charger
- Electric dryer
- Oven/range
- Heat pump water heater
- Pool/spa equipment
Because the likely target is whole-home backup with smart load management, the rough-in should emphasize clear equipment space, load labeling, and control pathways rather than prematurely creating a small “only these circuits work” backup panel.
Ventura-specific take: because the roof is large and south-facing, preserve the ability to install a serious conventional system later. Given the battery-location challenge, the rough-in should assume a multi-kW rooftop array, a gateway/service-equipment area near the main panel, and batteries that may be physically remote but connected by a clean hidden pathway.
Questions for the electrician now
- Can we route a straight, accessible empty conduit from attic/roof to the equipment area?
- Is the main service/panel sized for future solar backfeed, battery gateway, EV charging, and electrification loads?
- Where could batteries be code-compliant and serviceable if they cannot be near the main panel?
- If we want whole-home backup with smart load management later, should we create any critical-loads subpanel now, or just preserve gateway/load-management space and keep large loads controllable?
- Can we leave spare conduits from the main panel/gateway area to the likely remote battery wall and from the network closet to the equipment wall?
- For the likely SE-corner-to-west-wall route, what conductor sizing, conduit fill, attic-temperature derating, voltage-drop allowance, pull points, and communications separation should be planned now?
- Can roof penetrations and vents be placed away from the prime south-facing solar area?
What not to overdo
Do not lock into one vendor too early. Battery, inverter, smart-panel, and load-management ecosystems change. Conduit, panel/gateway space, labeled circuits, backing/blocking, photos, and clear remote-battery pathways are durable; proprietary wiring assumptions may not be.
Also avoid expensive work that can be done cleanly later. If a future installer can add the device at the panel or at the load without opening finished walls, defer it. If the future work would mean exterior conduit, drywall cuts, or awkward equipment placement, rough in the pathway now.
Sources